| Name HP tooltip |
SPD | Level Type |
Affinities | Locations Drops |
|---|---|---|---|---|
| 80 Mob
| Weak:
Resist: | Antiquity Garulea Continent (Hard) Hokishi Forest | ||
| Leaf Monster | 80 Mob
| Weak:
Resist: | Antiquity Garulea Continent (Hard) Hokishi Forest | |
| Hair Demon | 80 Mob
| Weak:
Resist: | Antiquity Garulea Continent (Hard) Hokishi Forest |
Antiquity Garulea Continent (Another Dungeon)
From Another Eden Wiki
| Antiquity Garulea Continent Antiquity Era | |
|---|---|
| |
| Synonym | AGAD
|
| Rec. Level (Hard) | 80 |
| Story Character Light/Shadow Points |
|
| Difficulty | 1st Reward |
2nd Reward |
3rd Reward |
4th Reward |
5th Reward |
|---|---|---|---|---|---|
| Hard | 24+ | 60+ | 120+ | 240+ | 360+ |
Area
| Map type | Map Names | Minimaps |
|---|---|---|
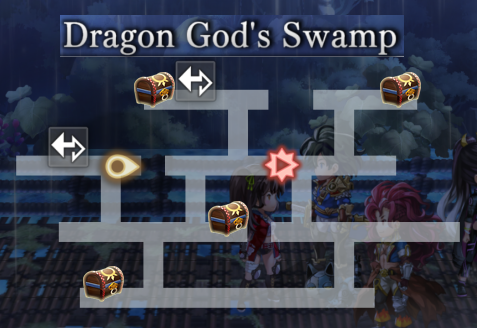
| Chest Maps | Dragon God's Swamp Funeral Cavern Ship Graveyard | _Mini_Dragon_God%27s_Swamp.png)
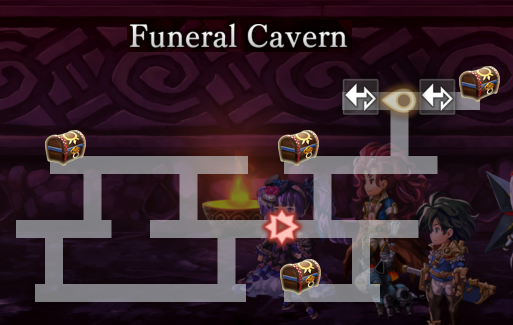
 _Mini_Funeral_Cavern.png)
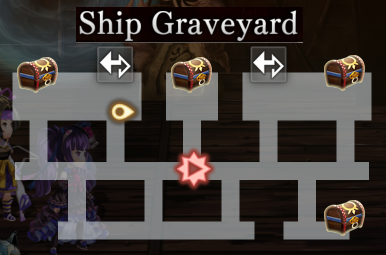
 _Mini_Ship_Graveyard.png)
 |
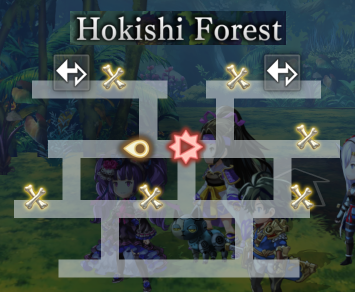
| Monster Femur Maps | Hokishi Forest Talgana Mountain Trail Kuruchi Cove | _Mini_Hokishi_Forest.png)
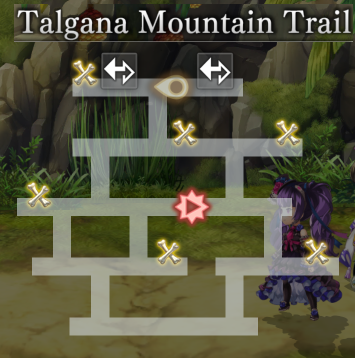
 _Mini_Talgana_Mountain_Trail.png)
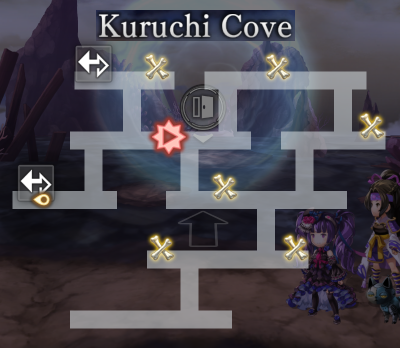
 _Mini_Kuruchi_Cove.png)
 |
| Safe Maps | Gadaro Zami Dogu's Domain |
Edit Mechanics page MechanicsAntiquity Garulea Continent costs 2 Green Keys to enter, and operates differently from most other Another Dungeons. The player starts in Gadaro, an enemy-free map where they can trade in various materials gathered throughout the rest of the Another Dungeon. In each map, the player gets to choose between two possible destinations, randomly selected from the pool of eight maps. The destination will always be different from your current map, and it is possible to visit the same destination twice in a single run. If the player does revisit a map, its rewards (chests and sparkle points) are refreshed and rerolled. After traversing three maps, the next pair of portals brings them to two of three possible bosses - Sacred Beast, King Tsuchino-Bunmei, or Big Gonjuro. Unlike other Another Dungeons, there is no limit to the number of random encounters each map with enemies can give. However, all mobs here will only drop Grasta Fragments. The chest in the boss room has slight variations depending on which boss you're against. The chest will give Fragments, Crystals, or rarely a Jadeite of the specific type. Sacred Beast's chest will give Support pieces, Big Gonjuro's gives Attack pieces, and King Tsuchino-Bunmei's give Life pieces. Monster Femur AreasThe Hokishi Forest, Talgana Mountain Trail, Kuruchi Cove don't contain chests, but instead have four sparkle points. Interacting with these sparkle points yields Monster Femurs which can be traded in Zami for Grastas. One of these sparkle points will also always contain a colored fragment, 20 of which are needed to make a paint in Gadaro. Once you have 20 of these fragments, you cannot obtain any more from the corresponding map. The Hokishi Forest gives Ancient Forest's Fragments; Talgana Mountain Trail gives Mountaintop's Fragments; Kuruchi Cove gives Whirling Tides' Fragments. ZamiThis is an enemy-free zone where the player can trade Monster Femurs for Grastas. There are two merchants in this area: The merchant in the center (Recycling Shop) gives low-tier debuff resistance/continuous regen Grastas for 5 Monster Femurs and medium-tier Pain/Poison damage buff or debuff resistance Grastas for 20 Monster Femurs. The merchant in the inn (Straw Dummy Fan) gives high-tier Grastas or Jadeites for 10 Monster Femurs apiece, but has limited stock. He has a total of 50 items, and his trade selection includes three random choices from this pool. These include HP Recovery/MP Recovery Grastas for the remaining weapon types not obtained in the story (13 total), Grastas that teach an elemental AOE attack skill for each weapon type (32 total), or Jadeite (3 Support, 1 Life, 1 Attack). If the player visits Zami twice in a single run, the merchants' Grasta selection will be different. If the player is forced to abandon their run, any Bones they expended in trade will not be refunded. There is also a rest point in the Inn where the party can replenish their HP and MP. However, the inn does not provide any food after resting. Dogu's DomainThis zone is also enemy-free but also has a low appearance rate. The only thing to do here is to collect a Superior Dogu for 100 Git (the first one is free). This Superior Dogu can be traded in Gadaro for rare Grastas. Gadaro TradingDye FragmentsThe path to the far right is where three carved out hollows. You must collect 20 of any one dye fragment to trade to the Craftsman betwen the portals for the wall painting to fill the given hollow. Doing so will award the player with a unique armor. Ancient Forest's Fragments make the Forest Wall-painting which unlocks the Jungle Bracelet. Mountaintop's Fragments make the Mountain Wall-painting for the Apex Necklace. Whirling Tides' Fragments make Sea Wall-painting which unlocks the Helix Ring. Superior DoguYour Superior Dogu can be exchanged with the Young Man near the portals and the Girl in the house for high-tier Grastas that teach a new skill to the character equipping them. These skills will appear as part of the character's skill list and you will need to dedicate a skill slot for it to be usable in combat. Like with most other high-tier Grastas, they are weapon-restricted; the Staff variant will be offered first, followed by Sword, and so on until the stock is exhausted with the Hammer variant. The Young Man's Grastas use Support pieces and bestow a buff skill that affects everyone in the party using the matching weapon. The Girl's Grastas use Life pieces and give a healing skill that restores 50% of the user's max HP. After you acquire all 16 unique Grastas from the above two NPCs, the Elderly Woman will trade Jadeites for any subsequent Superior Dogu you acquire. She will offer Jadeites in a cycle of Attack, Life, Support. |
Enemies
| Name HP tooltip |
SPD | Level Type |
Affinities | Locations Drops |
|---|---|---|---|---|
 Dogu Type A Dogu Type A
| 80 Mob
| Weak:
Resist: | Antiquity Garulea Continent (Hard) Talgana Mountain Trail | |
 Mountain Spirit Mountain Spirit
| 80 Mob
| Weak:
Resist: | Antiquity Garulea Continent (Hard) Talgana Mountain Trail | |
 Spiked-Tail Bunbuku Spiked-Tail Bunbuku
| 80 Mob
| Weak:
Resist: | Antiquity Garulea Continent (Hard) Talgana Mountain Trail |
| Name HP tooltip |
SPD | Level Type |
Affinities | Locations Drops |
|---|---|---|---|---|
 Crystal Tortoise Crystal Tortoise
| 80 Mob
| Weak:
Resist: | Antiquity Garulea Continent (Hard) Kuruchi Cove | |
| Water-Spirit Demon | 80 Mob
| Weak:
Resist: | Antiquity Garulea Continent (Hard) Kuruchi Cove | |
| Platinum Dogu | 80 Mob
| Weak:
Resist: | Antiquity Garulea Continent (Hard) Kuruchi Cove |
| Name HP tooltip |
SPD | Level Type |
Affinities | Locations Drops |
|---|---|---|---|---|
| Nishiki Coelus | 80 Mob
| Weak:
Resist: | Antiquity Garulea Continent (Hard) Dragon God's Swamp | |
| Unryu | 80 Mob
| Weak:
Resist: | Antiquity Garulea Continent (Hard) Dragon God's Swamp | |
| Corpse Flower | 80 Mob
| Weak:
Resist: | Antiquity Garulea Continent (Hard) Dragon God's Swamp |
| Name HP tooltip |
SPD | Level Type |
Affinities | Locations Drops |
|---|---|---|---|---|
 Dogu Type B Dogu Type B
| 75 Mob
| Weak:
Resist: | Antiquity Garulea Continent (Hard) Funeral Cavern | |
 Bone-Spirit Wolf Bone-Spirit Wolf
| 75 Mob
| Weak:
Resist: Null: | Antiquity Garulea Continent (Hard) Funeral Cavern | |
 Black Metal Dogu Black Metal Dogu
| 75 Mob
| Weak:
Resist: | Antiquity Garulea Continent (Hard) Funeral Cavern |
| Name HP tooltip |
SPD | Level Type |
Affinities | Locations Drops |
|---|---|---|---|---|
 Ship Warrior Ship Warrior
| 80 Mob
| Weak:
Resist: Absorb: | Antiquity Garulea Continent (Hard) Ship Graveyard | |
 Iron Wheel Iron Wheel
| 80 Mob
| Weak:
Resist: | Antiquity Garulea Continent (Hard) Ship Graveyard | |
 Gazami Gazami
| 80 Mob
| Weak:
Resist: Null: | Antiquity Garulea Continent (Hard) Ship Graveyard | |
| Ship Soldier | 80 Mob
| Weak:
Resist: Absorb: | Antiquity Garulea Continent (Hard) Ship Graveyard |
| Name HP tooltip |
SPD | Level Type |
Affinities | Locations Drops |
|---|---|---|---|---|
| Coral Crab
| 90 Horror
| Weak:
Resist: Null: | Antiquity Garulea Continent (Hard) Ship Graveyard | |
| Purity Hoki
| 90 Horror
| Weak:
Resist: | Antiquity Garulea Continent (Hard) Kuruchi Cove | |
| Black Steel Statue
| 90 Horror
| Weak:
Resist: | Antiquity Garulea Continent (Hard) Funeral Cavern | |
| Rolling Old Tanuki
| 90 Horror
| Weak:
Resist: | Antiquity Garulea Continent (Hard) Talgana Mountain Trail | |
| Ever-Dead Tree | 90 Horror
| Weak:
Resist: | Antiquity Garulea Continent (Hard) Hokishi Forest | |
| Dead-Eating Flower | 90 Horror
| Weak:
Resist: | Antiquity Garulea Continent (Hard) Dragon God's Swamp |
| Name HP tooltip |
SPD | Level Type |
Affinities | Locations Drops |
|---|---|---|---|---|
 King Tsuchino-Bunmei King Tsuchino-Bunmei
| ??
Boss
| Weak:
Resist: | Antiquity Garulea Continent (Hard) • None | |
| 160 | ??
Boss
| Weak:
Resist: | Antiquity Garulea Continent (Hard) • None | |
| 80 | ??
Boss
| Weak:
Resist: | Antiquity Garulea Continent (Hard) • None |
Repeatable Rewards
Treasure Chest Contents
| Antiquity Garulea Continent (Another Dungeon) Treasure Chest Contents | ||||||
|---|---|---|---|---|---|---|
| Map Type | Map 1 | Map 2 | Map 3 | |||
| Chest Maps | Dragon God's Swamp | Funeral Cavern | Ship Graveyard | |||
Chest 1 (C)
Chest 2 (N)
|
Chest 3 (NE)
Chest 4 (SW)
|
Chest 1 (NW)
Chest 2
|
Chest 3 (C)
Chest 4
|
Chest 1 (SE)
Chest 2
|
Chest 3 (N)
Chest 4
| |
| Boss Maps | Sacred Beast | King Tsuchino-Bunmei | Big Gonjuro | |||
Chest 1
|
Chest 1
|
Chest 1
| ||||
| Sparkle Maps | Hokishi Forest | Talgana Mountain Trail | Kuruchi Cove | |||
Monster Femur sparkle points x3:
Once per map until 20 collected:
|
Monster Femur sparkle points x3:
Once per map until 20 collected:
|
Monster Femur sparkle points x3:
Once per map until 20 collected:
| ||||
| Other Maps | Dogu's Domain | |||||
| ||||||
Completion Rewards
Each of these items has a chance to drop from each unlocked end reward slot, upon finishing Another Dungeon. Drop rates are fixed and not affected by player actions.
Support (T2)


Physical Debuff Resistance
MP +25 END/SPR/SPD/LCK +5
Upgrade:  Physical resist debuff resistance +100%
Obtain: AGAD: Zami merchant (20 Monster Femur), Completion reward
Attack (T2)
Power of Pain
INT +5 SPD +5
Damage +30% if target has  pain
pain
Upgrade: 50% chance to cast Pain (3 turns) on target when attacking
Obtain:
- AGAD: Zami merchant (20 Monster Femur)
- AGAD: Completion reward
- FGAD: Completion Reward
Attack (T2)
Power of Pain
PWR +5 INT +5
Damage +30% if target has pain
Upgrade: 50% chance to cast Pain (3 turns) on target when attacking
Obtain:
- AGAD: Zami merchant (20 Monster Femur)
- AGAD: Completion reward
- FGAD: Completion Reward
Attack (T2)
Power of Pain
PWR +5 LCK +5
Damage +30% if target has pain
Upgrade: 50% chance to cast Pain (3 turns) on target when attacking
Obtain:
- AGAD: Zami merchant (20 Monster Femur)
- AGAD: Completion reward
- FGAD: Completion Reward
Attack (T2)
Power of Poison
INT +5 SPD +5
Damage +30% if target has  poison
Upgrade: 50% chance to cast Poison (3 turns) on target when attacking
Obtain:
- AGAD: Zami merchant (20 Monster Femur)
- AGAD: Completion reward
- FGAD: Completion Reward
Attack (T2)
Power of Poison
PWR +5 INT +5
Damage +30% if target has poison
Upgrade: 50% chance to cast Poison (3 turns) on target when attacking
Obtain:
- AGAD: Zami merchant (20 Monster Femur)
- AGAD: Completion reward
- FGAD: Completion Reward
Attack (T2)
Power of Poison
PWR +5 LCK +5
Damage +30% if target has poison
Upgrade: 50% chance to cast Poison (3 turns) on target when attacking
Obtain:
- AGAD: Zami merchant (20 Monster Femur)
- AGAD: Completion reward
- FGAD: Completion Reward
Support (T2)
Proficiency Debuff Resistance
MP +25 END/SPR/SPD/LCK +5
Upgrade: PWR/INT/SPD debuff resistance +100%
Obtain: AGAD: Zami merchant (20 Monster Femur), Completion reward
Support (T2)
Type Debuff Resistance
MP +25 END/SPR/SPD/LCK +5
Upgrade:  Type resist debuff resistance +100%
Obtain: AGAD: Zami merchant (20 Monster Femur), Completion reward
※ Each of these tomes drops with 0.1% rate from each reward slot.
※ Total rate per reward slot: 0.1% (each) x 12 (released) = 1.2% (any of 12)
※ Total rate per reward slot: 0.1% (each) x 12 (released) = 1.2% (any of 12)
※ Each of these tomes drops with 0.1% rate from each reward slot.
※ Total rate per reward slot: 0.1% (each) x 81 (released) = 8.1% (any of 81)
※ Total rate per reward slot: 0.1% (each) x 81 (released) = 8.1% (any of 81)
| Hard
|
|---|
|
| Difficulty | Stat | 1st Reward | 2nd Reward | 3rd Reward |
|---|---|---|---|---|
| Main Stat Type: | ' | ' | ' | |
| Hard | Main Stat | |||
Purchasable Grastas
Exchange ![]() Monster Femur for additional grastas
Monster Femur for additional grastas
Support (T2)
Physical Debuff Resistance
MP +25 END/SPR/SPD/LCK +5
Upgrade: Physical resist debuff resistance +100%
Obtain: AGAD: Zami merchant (20 Monster Femur), Completion reward
Support (T1)Shareable
Proficiency Debuff Resistance
MP +25 END/SPR/SPD/LCK +3
Upgrade: Share effect with allies
Obtain:
- AGAD Zami merchant (5 Monster Femur)
- Overworld Mobs:
- Dragon God's Swamp Corpse Flower (MP/END)
- Hokishi Forest Hair Demon (MP/SPD)
- Prison Ship Gulfagin (MP/SPR)
Attack (T2)
Power of Pain
INT +5 SPD +5
Damage +30% if target has pain
Upgrade: 50% chance to cast Pain (3 turns) on target when attacking
Obtain:
- AGAD: Zami merchant (20 Monster Femur)
- AGAD: Completion reward
- FGAD: Completion Reward
Attack (T2)
Power of Pain
PWR +5 INT +5
Damage +30% if target has pain
Upgrade: 50% chance to cast Pain (3 turns) on target when attacking
Obtain:
- AGAD: Zami merchant (20 Monster Femur)
- AGAD: Completion reward
- FGAD: Completion Reward
Attack (T2)
Power of Pain
PWR +5 LCK +5
Damage +30% if target has pain
Upgrade: 50% chance to cast Pain (3 turns) on target when attacking
Obtain:
- AGAD: Zami merchant (20 Monster Femur)
- AGAD: Completion reward
- FGAD: Completion Reward
Attack (T2)
Power of Poison
INT +5 SPD +5
Damage +30% if target has poison
Upgrade: 50% chance to cast Poison (3 turns) on target when attacking
Obtain:
- AGAD: Zami merchant (20 Monster Femur)
- AGAD: Completion reward
- FGAD: Completion Reward
Attack (T2)
Power of Poison
PWR +5 INT +5
Damage +30% if target has poison
Upgrade: 50% chance to cast Poison (3 turns) on target when attacking
Obtain:
- AGAD: Zami merchant (20 Monster Femur)
- AGAD: Completion reward
- FGAD: Completion Reward
Attack (T2)
Power of Poison
PWR +5 LCK +5
Damage +30% if target has poison
Upgrade: 50% chance to cast Poison (3 turns) on target when attacking
Obtain:
- AGAD: Zami merchant (20 Monster Femur)
- AGAD: Completion reward
- FGAD: Completion Reward
Life (T1)Shareable
Power of Regen
HP +150 INT +3
Continuous  HP Regen
Upgrade: Share effect with allies of matching weapon
Obtain:
- AGAD: Zami merchant (5 Monster Femur)
- Overworld Mob Drops: Talgana Mountain Trail Mountain Spirit
Support (T1)Shareable
Type Debuff Resistance
MP +25 END/SPR/SPD/LCK +3
Upgrade: Share effect with allies
Obtain:
- AGAD: Zami merchant (5 Monster Femur)
- Overworld:
- Dragon God's Swamp Unryu (MP/LUK)
- Hokishi Forest Poisonous Moth (MP/SPR)
- KMS Eastern Division Cyber Mononofu (MP/END)
- Prison Ship Gulfagin Security Hound (MP/SPD)
Non-repeatable Rewards
Support (T3)
Ax's Prayer
MP +50 LCK +10
Obtain Ax's Prayer skill
Upgrade: Obtain True Ax's Prayer skill
Obtain: AGAD: Gadaro Superior Dogu exchange
Support (T3)
Bow's Prayer
MP +50 LCK +10
Obtain Bow's Prayer skill
Upgrade: Obtain True Bow's Prayer skill
Obtain: AGAD: Gadaro Superior Dogu exchange
Support (T3)
Fist's Prayer
MP +50 LCK +10
Obtain Fist's Prayer skill
Upgrade: Obtain True Fist's Prayer skill
Obtain: AGAD: Gadaro Superior Dogu exchange
Support (T3)
Hammer's Prayer
MP +50 SPD +10
Obtain Hammer's Prayer skill
Upgrade: Obtain True Hammer's Prayer skill
Obtain: AGAD: Gadaro Superior Dogu exchange
Support (T3)
Katana's Prayer
MP +50 LCK +10
Obtain Katana's Prayer skill
Upgrade: Obtain True Katana's Prayer skill
Obtain: AGAD: Gadaro Superior Dogu exchange
Support (T3)
Lance's Prayer
MP +50 LCK +10
Obtain Lance's Prayer skill
Upgrade: Obtain True Lance's Prayer skill
Obtain: AGAD: Gadaro Superior Dogu exchange
Life (T3)
Self-Healing
HP +300 END +10
Obtain Self-Healing Skill
Upgrade:  MP Costs -10%
Obtain: AGAD: Gadaro Superior Dogu exchange
Support (T3)
Staff's Prayer
MP +50 SPD +10
Obtain Staff's Prayer skill
Upgrade: Obtain True Staff's Prayer skill
Obtain: AGAD: Gadaro Superior Dogu exchange
Support (T3)
Sword's Prayer
MP +50 LCK +10
Obtain Sword's Prayer skill
Upgrade: Obtain True Sword's Prayer skill
Obtain: AGAD: Gadaro Superior Dogu exchange
Life (T3)
HP Recovery
HP +300 END +10
Reserve  HP Restore +100%
Upgrade: Restore 100% HP in reserve
Obtain: AGAD: Zami merchant (10 Monster Femur)
Life (T3)
MP Recovery
HP +300 SPR +10
Reserve  MP Restore +100%
Upgrade: Restore MP 100% in reserve
Obtain: AGAD: Zami merchant (10 Monster Femur)
| Name | Stats | Obtain / Effects |
|---|---|---|
| |
185 - Def
166 - MDef
60 - LVL |
Antiquity Garulea Continent (Hard)
|
| |
166 - Def
166 - MDef
60 - LVL |
Antiquity Garulea Continent (Hard)
|
| |
150 - Def
185 - MDef
60 - LVL |
Antiquity Garulea Continent (Hard)
|
| Rank | Name | Requirement | Reward |
|---|---|---|---|
| Reclaiming the Antiquity Garulea Continent | Clear Antiquity Garulea Continent (HARD) |