Chapter 2 page to edit
| Resolution
|
| Suggested Level
|
45
|
| Requirements
|
Complete previous chapter
|
| Start Location
|
Rippling Forest
|
| Reward
|
 x20  |
| Release Date
|
July 28, 2020
|
Summary[edit]
The one who saved the day was Lakhesis, an ex-knight, driven from the order. it seems that he is now secretly working to stop those very knights.
Procedure[edit]
| Quest Step
|
Destination
|
Notes
|
| Head to the resistance base in Rinde. |
The Port City of Rinde | - |
| Head to the resistance base. |
The Resistance Base Ship Bilge | Use the signboards to teleport to the harbor.
You cannot change your party or quick-travel until you proceed. |
| Talk to Radias and Lakhesis in Uruala. |
Uruala | - |
| Head back to the ship to discuss your plan. |
The Resistance Base Deck | You can quick-travel to Uruala. |
| Recruit more resistance members. |
The Resistance Base Deck | You'll need 4 more resistance members, but you can recruit up to 7.
- Recruit a doctor from Rinde's tavern at night. You need the Chimera Killer drink from Uruala.
- Recruit a repairman from the Rinde lighthouse.
- Learn of the Scholar in the Uruala well, then recruit him at Serena Coast.
- Recruit the beastman in the Rippling Forest, after decorating the grave with flowers from Uruala.
You will need to return to the resistance ship to speak with the quest character before you are able to recruit the last 3
- Recruit the Chef from Uruala Tavern but you will need to catch 4 Shelter Crabs from Parallel Serena Coast first.
- Recruit the Bard from near Rinde's food stalls, but you need to gather 10 leaves in the Parallel Time Layer.
- Recruit the Knight from the Parallel Unigan tavern.
|
| Return to the ship and decide on a strategy. |
The Resistance Base Ship Bilge - Meeting Room | - |
| Go meet the royal beastfolk convoy on Serena Coast. |
Parallel Serena Coast | Resistance Battle mechanic introduced (see below)
Boss battle with the Armored Mercenary. |
| Perform the sealing ceremony at the reception hall. |
Reception Hall | - |
| The Parallel Serena Coast (Escort Ev.) has been added to the Spacetime Rift Record Room (#011) |
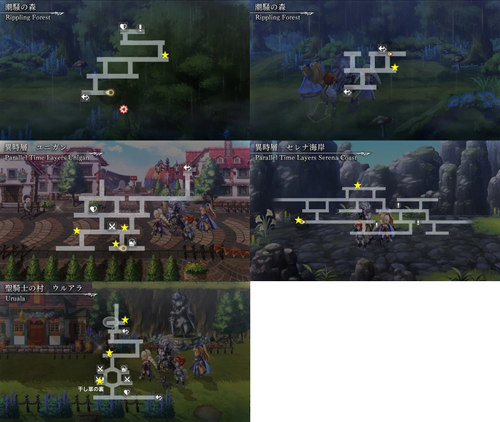
Bard Leaf Location[edit]
Resistance Battle[edit]
The Resistance Battle takes place along one of two routes the player chooses. Both roads start with a fight against one Tempered Patroller and end with a fight against one Tempered Raider. The upper route has six Lv50 Tempered Hounds while the lower route has three Lv80 Tempered Soldiers to fight. After the fight with the Tempered Raider but before the boss fight with the Armored Mercenary is a character marked with an exclamation who will restore the party's HP and MP. All other exclamation marks on the map are Sheltered Crabs - attempting to catch these during the Resistance Battle will waste one turn each.
Before each fight commences, the player has the option of viewing enemy details and selecting a support member for the beginning of that fight. Any of the seven possible resistance members that have been recruited may provide support. More than one resistance member can be selected per fight but each one can only be used once for the entire Resistance Battle. Each resistance member provides different supports at the start of each fight.
| Resistance Member
|
Support
|
| Beast |
+SPD on party front row at start of fight |
| Shelter Crab Man |
Another Force gauge full at start of fight |
| Scholar |
100% Critical Rate on party front row at start of fight |
| Bard |
No enemy resistances at start of fight |
| Shipbuilder |
Lower enemy PWR and INT at start of fight |
| Knight |
+INT and +PWR on party front row at start of fight |
| Doctor |
Megapoison on enemy at start of fight |
You will receive a reward based on how many turns you spent in battle before reaching the goal. The ultimate prize, which is a United Knight Proof Grasta, is gained by getting to the goal in 8 turns or less. Note that the battle against the Armored Mercenary Boss takes place after the resistance battle scenario is completed. You don't have to get the prize on the first attempt - you can revisit Parallel Serena Coast (Escort Lv.) in the Spacetime Rift.
Bonus page to edit
Enhance Special Attack (Miglance)[edit]
After Chapter 2, you can purchase bouquets from a girl in Uruala for 100 Git apiece. Lay them out at each grave on the north end of the map. The girl only stocks 3 at a time, but replenishes within 15 minutes. Once you've laid bouquets in front of all 11 graves, return to town and ring the bell in the center (tap the bell - it does not have a marker). The old man will reward you with this special Grasta.
Toil and Trouble[edit]
At the bottom-left room of Burning Beast King's Castle 4F (Parallel Time Layer), speak to the beast inside to obtain a Chemical Base. Bring it to the cauldron room in the Beast King's Castle 3F Lodgings (Present), and you will obtain Chemistry Intellect. It is used for creating Alchemic Pinnacle.
A Second Adamantine Weapon is obtainable after doing the First Knight and the Holy Sword Side story. After finishing the Episode, investigate the second floor of Parallel Miglance Castle, and check behind the bookcase in Deirdre's Quarters. You will get another Geo Metal Lock Box, and create a second Adamantine Weapon like you did with your first.
Deirdre's Grastas and Verweil[edit]
After completing the episode, bring Deirdre to the mirror where you unlock manifest weapons. While the Demon Grandpa will initially decline a manifest battle for Deirdre, a prompt for different cutscene appears right next to the mirror, and trigger the fight for Demon Sword Verweil. After obtaining Verweil, you will need to unlock its full power like any other manifest.
There are a total of three Unified Knight Proofs for Deirdre. The first is obtained from the Resistance Battle, which can be revisited in the Spacetime Rift (choose Parallel Serena Coast). You need to finish within 8 turns to earn the Grasta.
The other two Unified Knight Proofs are obtained by trading in The Port City of Rinde at night. Speak with the man at the base of the lighthouse. You will need to exchange ten Tempered Cores and ten Rippling Mushrooms from the Berserk Tempered Hound and Celestial Mushroom respectively.
➜
After completing the Episode, Bria can be upgraded to her 4★ form with a Griffin Lance Tome. The Episode will grant you a guaranteed Griffin Lance Tome at 37,500  Ethereal Dewdrops.
Bring Bria to Serena Coast to commence her 5★ upgrade quest. Complete it at Karek Swampland. This will unlock the 5★ board, but Bria will require an Areth's Diamond Tome and 5 Chant Scripts to fully upgrade.
Guildna's Personal Armor[edit]
In Burning Beast King's Castle 3F (first accessed from 4F terrace; head to the Records Room, option number 012, if you already cleared the epidode), if you bring 3 lunchboxes to the Nopaew you'll receive Guildna's personal armor Bracelet of Despair. To find out what kind of lunchbox the Nopaew wants, you need to have Poporo in your party to translate.
The Nopaew will ask for a random food item from the Miglenia Continent in any of the three time periods. The hint always corresponds to the message you get after eating a food item. You may also be asked for a food that you have not eaten before.
Antiquity[edit]
Present[edit]
Lost Puppet[edit]
At the Port City of Rinde at night, head to the upper platform and speak with the girl by the benches. She'll tell you to look for her puppet.
- Talk with the Elder in the house to the right of the inn.
- Travel to the roof of the lighthouse and speak with the guy. He'll muse about the lone girl.
- Check back between the girl and the above two NPCs. Their dialogue should change.
- The Elder should warn you to stay in lit areas or be lost like his daughter.
- The man on the lighthouse should advise you to speak directly to the girl to go home, and be surprised at her disappearance.
- The girl disappears from the upper square. No information is known about how to continue from here.
- You can find a free MP (sword) grasta in Uruala if you go to the well and follow the underground path to another well, exit and speak to the man sitting on the bench there


