Tales from the East. Return of the Goddess of Time. Volume 1

From Another Eden Wiki
Tales from the East. Return of the Goddess of Time. Volume 1
Return of the Goddess of Time Volume 1.png
Requirements
Start Location Baruoki
Reward Character --
Dungeon Present Garulea Continent
New Mechanic Grasta
Release Date Dec 05, 2019
Japanese Name 第2部 東方異象編 時の女神の帰還 前編

Summary

Story
Long ago, there existed Ogre Rancorem,
a sword cursed by the hatred and burning rage of the Ogre Clan.
The cursed sword, said to bring calamity upon the world, was drawn by Aldo,
a young man who was lead by fate to an adventure through space time...
Meanwhile, in the Garulea Continent of the East on the other side of the sea,
the Land of Mi and Shin formed an alliance to invade the West.
Aldo and others weren't aware that the war had commenced
and the world was quietly preparing for disaster.
After learning about these events, the party decided
to travel across the sea to stop the Eastern Alliance.
At the same time, his friends from the East
longed for their homeland, with unshakable wills in each of their hearts.
New enemies, Specters and Demons, await in the East.
And who is this "Goddess of Time" that Ogre Rancorem spoke about?
Aldo and his party sets off on a new journey to a new land, the
Eastern Garulea Continent!


Quest Line

Chapter 45 page to edit
Friends: To the Other End of Time
New Chapter: Voice of the Goddess of Time Calls
Suggested Level --
Requirements

Cleared Chapter 44
Cleared Azure Rebel

Start Location The Mayor's House
Reward
Gem.png x100Copper Rank Badge.png

Summary[edit]

In the end Zennon's unceasing trickery and treachery did not avail him—he was struck through the chest with Palsifal and slain. We finally got Altena back, and the ogres are defeated!

Procedure[edit]

  • Talk to the Mayor to begin the new chapter and start the line of quests.
Chapter 46 page to edit
New Chapter: Voice of the Goddess of Time Calls
Friends: To the Other End of Time
To the East! Something Awaits Across the Sea
Suggested Level --
Requirements

Cleared Chapter 45

Start Location Baruoki
Reward
Gem.png x100Copper Rank Badge.png

Summary[edit]

As usual, Aldo wakes one morning in his room in Baruoki. With the battle with the ogres over, days of peace had followed in its path. However, this tranquility was not to last.

Procedure[edit]

  • Initiate the quest at the statue in the center of Baruoki.
  • Meet King Miglance in the Unigan Inn.
Chapter 47 page to edit
To the East! Something Awaits Across the Sea
New Chapter: Voice of the Goddess of Time Calls
Cat Shrine: Awakening a New Power
Suggested Level --
Requirements

Cleared Chapter 46

Start Location Unigan Castle Walls
Reward
Gem.png x100Copper Rank Badge.png

Summary[edit]

One morning as Aldo wakes up in his room in Baruoki, he realizes that somebody had altered the course of history: The Kingdom of Miglance was now under rule of the Eastern Alliance! Just what is The Church of the Time Goddess? Aldo and the party sail the seas to head to the eastern continent.

Procedure[edit]

  • Start your quest in the Castle Walls on the west entrance of Unigan, and collect the Ship Boarding Permit.
  • Travel to Rinde and speak to the sailor on its east pier.
  • Your story members (Feinne, Riica, Amy, Cyrus, Helena, Guildna) will temporarily leave the party to explore Garulea. You also temporarily lose map access.
Chapter 48 page to edit
Cat Shrine: Awakening a New Power!
To the East! Something Awaits Across the Sea
Mystery of the Temple Ruins: The Bandits True Form?
Suggested Level 66
Requirements

Cleared Chapter 47

Start Location Izana
Reward
Gem.png x100Copper Rank Badge.png

Summary[edit]

The Kingdom of Miglance was now placed under the control of the Eastern Alliance. Aldo, with King Miglance's approval, boards a passenger ship to the East. After a long journey, he finally lands on the eastern continent of Garulea. What awaits him in the eastern lands?

Procedure[edit]

  • Enter the city gates. Receive the Fluffy Covers.
  • Explore Izana to gather your friends.
    • Feinne is in the Tavern.
    • Amy is in the Weapon Shop.
    • Riica can be found in the southwest house.
    • Cyrus can be found in the river in the far northeast corner of the area.
    • Helena is floating in the air, north of the Inn.
    • Guildna is found in a barrel in a house northeast of the Inn. Investigate the barrel three times.
  • Talk to the old man on the west side of the city. Your world map will expand to allow Quick Travel between the continents.
  • Exit through the northeast gate, and take the north path from the Inanari Plateau.
  • Quick Travel to the Cat Shrine is enabled.
  • Combat with 3x Lv67 Gold Spirits. Obtain Kiyosuke's Wallet.
  • Travel to the north part of the map. Boss battle with Ogre Baron and his Beloved Hound.
    • Both will start the battle with a long-lasting defensive buff.
    • Ogre Baron will periodically release a bomb. Striking the bomb will push it back, but the Hound will return the bomb if you use your faster characters for it. Eventually, at low enough health, the Hound will run off, leaving you to attack Baron with impunity.
    • Baron drops an Power of Fire Grasta on defeat.
  • You will also unlock the Grasta Board function.
Chapter 49 page to edit
Mystery of the Temple Ruins: The Bandits True Form?
Cat Shrine: Awakening a New Power
Kurosagi Castle: Welcome to the Ghost Banquet
Suggested Level 66
Requirements

Cleared Chapter 48

Start Location Izana
Reward
Gem.png x100Copper Rank Badge.png

Summary[edit]

Aldo arrives in the exotic port town of Izana, located in the Land of Mi. After listening to the siblings Omika and Kiyosuke, Aldo and the party heads to the Cat Shrine. At the end of the shrine, they defeat Ogre Baron once more. There, a servant to the feline deity appears, who grants them a special power. To bring back the wallet Jiro the Wandering Cat was protecting, the party returns to Izana. However...

Procedure[edit]

  • Return Kiyosuke's Wallet at Izana.
  • Take the northeast path from the Inanari Plateau.
  • Quick Travel to Temple Ruins enabled. You'll also unlock another Quick Travel as you venture further in.
  • Boss battle with Slash Demon & Cleave Demon.
    • Fight begins with Slash Demon.
    • Another Force stopper at 50% HP to force a switch.
    • Slash Demon prevents you from switching party members in and out for a few turns and mostly uses AoE attacks. His counter stance reacts to physical attacks.
    • Cleave Demon regularly splits between selves to confuse you. Debuffs and ailments do not transfer - use them to mark the true Cleave Demon. Clones also have significantly less health than the original.
Chapter 50 page to edit
Kurosagi Castle: Welcome to the Ghost Banquet
Mystery of the Temple Ruins: The Bandits True Form?
Land of Shin: The Suspicious Empress Snickers
Suggested Level 67
Requirements

Cleared Chapter 49

Start Location Izana
Reward
Gem.png x100Copper Rank Badge.png

Summary[edit]

As soon as the party hands Kiyosuke his wallet, the siblings are suddenly kidnapped by a group of raiders! Aldo, on a quest to save the two, rushes to the Temple Ruins. There he find out that the raiders were in fact members of the half-monster Demon Clan. As the party defeats the Cleave and Slash Demons, the Jiraiya Fortress suddenly appears before them! There they meet the Demon Clan's leader, Suzaku. The Demon Clan disappears, and Aldo makes his way back to the siblings' house in Izana...

Procedure[edit]

  • Bring the Letter of Introduction to the guards in front of Kurosagi Castle.
    • Quick Travel to Kurosagi Castle enabled.
  • Speak with Lord Genshin in the Audience Chamber.
  • Locate and pursue Ageha at the top of the castle. You temporarily lose map access, so your party can only recover in the bedroom during this time. Naturally, no food is given.
  • You must collect Genshin Analects to unlock hidden stairways; collecting all 10 missing Analects and bringing them to the bookshelf in the Audience Chamber reveals a hidden chest containing a Power of Gaia grasta.
  • Collect Genshin Analects 1, 2, and 7 scattered among the castle rooms on the first floor.
    • Analect 1 is needed to open the first stairway.
  • Collect Genshin Analects 3, 4, and 5 scattered among the castle rooms on the second floor.
    • Analect 3 is needed to open the second stairway.
  • Collect Genshin Analects 6, 8, 9, and 10 scattered among the castle rooms on the third floor.
  • Boss battle with Mask Monster on the rooftop.
    • Many of Mask Monster's skills apply Poison.
    • Another Force stopper at 30%.
    • Mask Monster begins using 2 skills per turn during the final phase.
  • Grasta board slot 2 unlocked.
  • The Kurosagi Castle (Night) has been added to the Spacetime Rift Record Room (#008)
Chapter 51 page to edit
Land of Shin: The Suspicious Empress Snickers
Kurosagi Castle: Welcome to the Ghost Banquet
The Specter Palace: Scared Stiff
Suggested Level 68
Requirements

Cleared Chapter 50

Start Location Izana Castle Walls
Reward
Gem.png x100Copper Rank Badge.png

Summary[edit]

One morning, Aldo wakes up to a different world: Someone had altered their history! To return it onto its proper course, Aldo and the party heads to the eastern continent of Garulea. After defeating the Mask Monster, the party continues its search for clues on the Goddess of Time, and heads further north of Mi to the Land of Shin.

Procedure[edit]

  • Head to the city of Nagsham and speak with the Soldier.
    • From Inanari Plateau, take the top left path to enter Vermillion Road.
  • Quick Travel to Nagsham enabled.
  • Speak to the guard who's blocking access to the Palace.
  • Play at least 1 minigame in town/to earn some amount of silver tockens to unlock next step
  • Speak with the Elderly Woman to access the Garden of Peace Pub.
  • Speak with the pub's Staff Member outside.
    • Initiates the 'Gather Ingredients' mini-game. Defeat monsters attracted to the Beef Buns.
  • Deliver the ingredients to Shanxi.
  • Deliver the Steamed Cat Bun to the Soldier to gain access to Nagsham Palace.
  • Speak to Empress Garneli in the Shrine.
Chapter 52 page to edit
The Specter Palace: Scared Stiff
Land of Shin: The Suspicious Empress Snickers
Wicked Meadow: Song of the Destructive Wind
Suggested Level 70
Requirements

Cleared Chapter 51

Start Location Nagsham Gates
Reward
Gem.png x100Copper Rank Badge.png

Summary[edit]

The Land of Shin was a glamourous and busy country. However, it appeared that their military was building its strength in this region, to counter the specters active here. Aldo and the party are tasked by the Empress Garneli with capturing the Specter Palace, which soars above the depths of the Kunlun Mountains. The party march across the storming winter mountain, setting their bearing on the Palace...

Procedure[edit]

  • Cross through the Kunlun Mountains to reach Specter Palace.
  • Boss battle with Sorcery Soldier at the summit.
    • Snowballs occasionally strike your team or the boss throughout the encounter. When striking a party member, they take damage and are stunned for 1 turn. When striking Sorcery Soldier, it gains a PWR buff for 1 turn.
    • Sorcery Soldier always uses Ice Breaker after gaining a PWR buff from snowballs.
    • The party will wipe to the avalanche if you fail to defeat the Sorcery Soldier within 18 turns.
  • Return to Shanxi in Nagsham to ask her how to diffuse Specter Palace's miasmic snowstorm.
  • Head to Vermillion Road to collect 100 Fresh Fall Leaves.
    • Collection points will be marked on your map. You can harvest more leaves per tree for every Forager trait in your party. However, you may end up encountering enemies instead of catching leaves. Beware of dropbears.
  • Return to Shanxi with the Fall Leaves and obtain the Vermilion Fan.
  • Head to Specter Palace to diffuse the snowstorm by taking the side mountain path Tsubame showed you in Kunlun Mountains.
  • Quick Travel to Specter Palace enabled.
  • Traverse through Specter Palace and find the Specter Palace Key. The Miracle Water room acts as a rest point.
    • Miracle Water shrinks your physical size temporarily, fading as you move. While shrunk, you can enter small holes to enter inaccessible areas. You can only encounter small critters, who will stay to engage you in battle instead of fleeing. If you are caught by a Cat horror, you are ejected from the crawlspace and return to normal.
    • Destroy seashells to disable the mist barriers in front of doors and stairways. These are found in the crawlspaces.
    • On two separate occasions, a Tsurube-otoshi Horror will drop from the ceiling in one of the rooms on 2F.
  • Boss battle with Ghastly Mizuchi, who erects a Void Shell at the start of the encounter.
    • Another Force stopper at 35%.
    • While Void Shell is active, all attacks made against Mizuchi will miss.
Chapter 53 page to edit
Wicked Meadow: Song of the Destructive Wind
The Specter Palace: Scared Stiff
Secret of the Lake: Illusion of the Chapel
Suggested Level 71
Requirements

Cleared Chapter 52

Start Location Nagsham Shrine Room
Reward
Gem.png x100Copper Rank Badge.png

Summary[edit]

To restore the altered history back to normal, Aldo and the party arrive at the eastern continent of Garulea. After defeating the ghastly Mizuchi, the party continues its search for clues on the Goddess of Time, departing to speak once more with Empress Garneli of the Land of Shin.

Procedure[edit]

  • Obtain the Letter of Authorization from Garneli, granting access to Mahora Lake.
  • Head towards Ikarga by crossing through the Wicked Meadow, then talk to the Elderly Woman.
  • Go to the hot springs in the Wicked Meadow.
Chapter 54 page to edit
Secret of the Lake: Illusion of the Chapel
Wicked Meadow: Song of the Destructive Wind
A Raid! Jiraiya Fortress is on the Move
Suggested Level 71
Requirements

Cleared Chapter 53

Start Location Ikarga - Eastern Road
Reward
Gem.png x100Copper Rank Badge.png

Summary[edit]

To restore history, Aldo and the party arrive at the eastern continent of Garulea. At Ikarga, they hear about the destroyed Land of Ro, and about a mysterious church that occasionally appears atop a lake. What will be waiting for the party at the Chapel of the Goddess of Time?

Procedure[edit]

  • Present the Letter of Authorization to the Soldier to gain access to Mahora Lake.
  • Reach the edge of the lake to find the Chapel of the Goddess of Time.
  • Quick Travel to the Chapel of the Goddess of Time enabled.
  • Speak to the Daughter of Time at the sanctuary.
  • Rush over to Izana to investigate the reason behind Suzaku's invasion.
Chapter 55 page to edit
A Raid! Jiraiya Fortress is on the Move
Secret of the Lake: Illusion of the Chapel
Time Asunder: Visage of the Void
Suggested Level 73
Requirements

Cleared Chapter 54

Start Location Jiraiya Fortress
Reward
Gem.png x100Copper Rank Badge.png

Summary[edit]

The Church of the Time Goddess, a place hidden in illusion welcomes Aldo and the party. Just then, the Jiraiya Fortress, commanded by the Demon Clan leader Suzaku and his other former Ro citizens, begin their advance towards Izana! Will the party be able to stop Jiraiya's push?!

Procedure[edit]

  • Infiltrate Jiraiya Fortress and locate reach the Connecting Bridge.
  • Quick Travel to Jiraiya Fortress enabled.
    • Navigating through the fortress involves going up and down cargo lifts from the ground to the catwalks.
  • Boss battle with Karakuri.
    • Another Force stoppers at 50% and 5%.
    • Karakuri cleanses himself of debuffs at the end of every turn.
  • Continue beyond Karakuri to reach the upper floors.
  • Quick Travel to Jiraiya Fortress - Upper Floors enabled.
    • Navigating through the upper floors involves moving platforms and ramps.
    • Quick Travel to Jiraiya Fortress - Deck enabled at the end.
  • Boss battle with Suzaku
    • This is a 2-phase fight with multiple Another Force stoppers. After you deplete Suzaku's health bar for the first time, he enters his demon form.
    • Suzaku's demon form has Another Force stoppers at 75% and 30%, though his skill order resets at 45%.
    • Once Suzaku casts Spirit Fire's Fiend, you must deal enough damage to him within 6 turns to prevent him from casting Wave of Embers, which causes heavy fire-type damage to your party.
  • Grasta board slot 3 unlocked.
Bonus page to edit
Bellwarden's Grace
Suggested Level 65
Requirements
Start Location Cat Shrine
Reward
Gem.png x10Copper Rank Badge.png
Release Date September 9, 2022

Summary[edit]

An event with Nyanjiro at the Cat Shrine Hokora lets you unlock the ability to Bind/Separate/Rescind Grasta from your Grasta menu without needing to be at any Cat Hokora. You'll also be told to speak to the shrine maiden who tells you of the hokora pilgrimage.

Procedure[edit]

  • Go to Cat Shrine and select the blue exclaimation icon over the Cat Hokora
  • Binding Grasta is unlocked on the menu
  • Talk to shrine maiden Nyanjiro mention
  • Start the hokora pilgrimage (The first 6 must be in the correct oder)
  • The Shrine Maiden will showcase how to pray using the Cat Shrine Cat Hokora. Get a Power of Regen (Awakened)
  • Go to the Cat Hokora in Ikarga. Get a Power of Nothingness (Awakened)
  • Go to the Cat Hokora in Wicked Meadow. Get Power of Gaia (Awakened) and Frag. of Attack x100
  • Go to the Cat Hokora in Izana. Get Power of Current (Awakened) and Frag. of Attack x100
  • Go to the Cat Hokora in Vermilion Road. Get Power of Blaze (Awakened) and Frag. of Attack x100
  • Go to the Cat Hokora in Nagsham. Get Power of Gust (Awakened) and Crystal of Attack x30
  • Go to the Cat Hokora in Kunlun Mountains. Get Power of Poison (T3 Awakened) and Power of Pain (T3 Awakened)
  • Cutscene with Nyanjiro that you completed the hokora pilgrimage and there are other Cat Hokora to find.
  • The remaining steps require more progression in the Main Story to unlock.
  • Go to the Cat Hokora in Jiraiya Fortress. You can find it if you teleport to the Deck and head east twice. Get Power of Absorption (Awakened)
  • Go to the Cat Hokora in Hidden Village Itoise. Get Power of MP Regen (Awakened)
  • Go to the Cat Hokora in Spacetime Rift. Get Supreme Power (Awakened)
    • Cat Hokora in Spacetime Rift will disappear after the reward is given.


Nagsham Celebration[edit]

Nagsham is in the middle of celebrating the Empress's birthday, and so it is host to several minigames. Each minigame offers Silver Tokens, which can be used to trade for souvenirs. The total number of Silver Tokens needed to get all of the souvenirs is 5910. The souvenirs can be given to Macminal.

If you've given at least one souvenir to Macminal, the next time you visit Macminal Museum you'll be informed that a separate section has been opened up in the museum. The display is accessed through the new staircase right by the entrance, showing off any items you've donated while in Unigan.

In the midst of Chapter 51, you gain access to the inner areas of Nagsham. It's host to another set of minigames, with each offering Gold Tokens. Gold Tokens are traded at the counter for the Gold Weapons Set that increase Git earned from battle. Each Gold weapon requires 500 Gold Tokens to redeem.

Bell Ringing[edit]

This is a test of timing. Tap to swing the log; you have to tap at the point when the log is closest to your character to build up momentum in its swing arc. With enough momentum, it should make contact with the bell. You earn 20 Silver Tokens for striking the bell once; hit it ten times or more and you earn 30, and if you hit it thirty times or more you are given 75 Silver Tokens.

Speaking to the Grandpa to the left of the bell after hitting it at least once will prompt him to give you 10 Silver Tokens. This can be triggered every time the condition is met.

Test Dummies[edit]

You have five turns to deal as much damage as possible to a test dummy. It has no resistances or weakness, but also doesn't fight back at all. After clearing this minigame for the first time, you have the opportunity to fight four test dummies at once. Regardless of how many you fight, you will be awarded Silver Tokens based on the total amount of damage you've dealt, capping at 50 Tokens.

Speaking to the female Bystander to the right of the Promoter's Grandpa after reaching a certain damage threshold will prompt her to give you 10 Silver Tokens. This can be triggered every time the condition is met. The amount of test dummies fought has no effect on this event.

Rock Crush[edit]

Tap on the screen to chip away at the rock. If you manage to unearth its embedded gem, you are awarded 20 Silver Tokens.

A different mode is unlocked after completing this minigame for the first time. You now have to plow through ten rocks in a short time -- a new rock will be immediately brought in once you're done with one. Destroying everything except the last rock, awards you 30 Silver Tokens. Completion awards you 35 Silver Tokens.

Cat Race[edit]

You have volunteered Varuo for the cat race. Before beginning, you can observe the conditions and strategies of your three opponents, and you are to pick the best strategy for Varuo based on this information and his current condition.

50 Silver Tokens are awarded for 1st place, 30 for 2nd, 20 for 3rd, 10 for last place.

Test of Power[edit]

A total of five logs will be present, randomly selected from between Disposable Logs, Cypress Logs, or Lacquered Logs. Each is with a different amount of points. Disposable Logs are weak to all forms of damage and are easily destroyed. Lacquered Logs remain on the battlefield for two turns at maximum before disappearing. Any logs destroyed are immediately replaced with a random log. You have four turns to destroy as many logs as possible, and you are rewarded Gold Tokens based on your score, up to a maximum of 120 at over 50 logs destroyed.

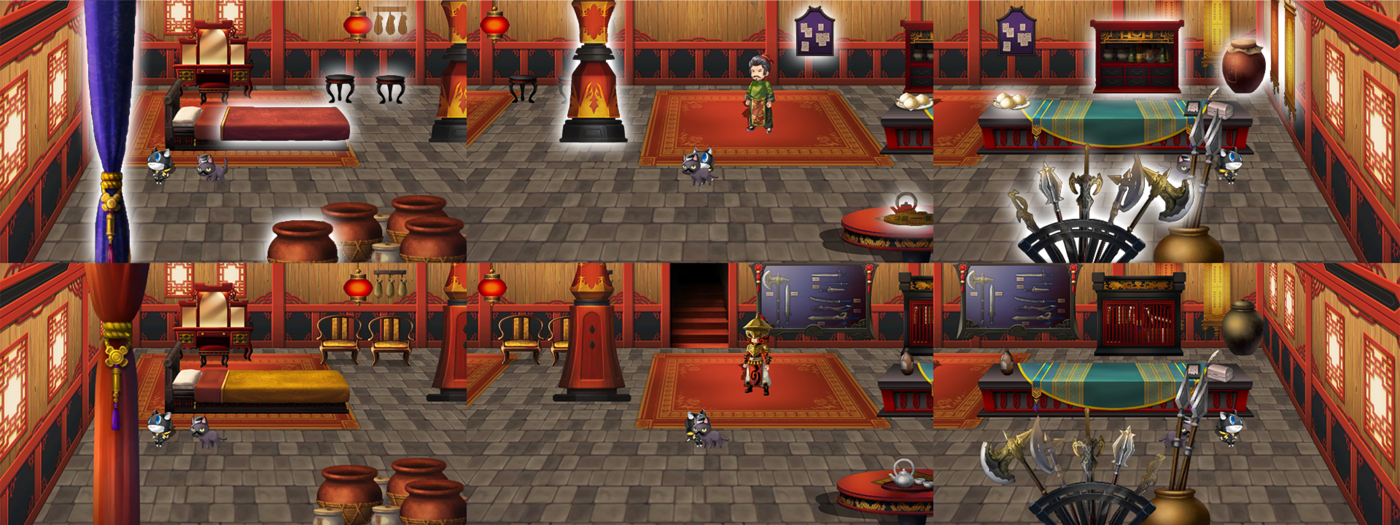
Spot the Difference[edit]

The northern house has two identical rooms, furnished almost differently. Tap on the differences you can find in the deepest room. You can only afford to make three mistakes before being disqualified. The game comes in two difficulties -- easy requires you to find three differences, and hard requires you to find five. Completing easy nets you 20 Gold Tokens, while Hard rewards 35. There are two differences NOT shown in the picture: the ceiling lamp left of the pillar can be shining and there can be 2 chairs at the cosmetic table.

Spot the Difference (Hard).png Spot the Difference (Hard).png

Gather Ingredients[edit]

Upon reaching Chapter 51, the pub's Staff Member requests that you help him collect ingredients. This can be done by defeating the monsters attracted to the buns. You will have to tap the center of the screen to be able to attack. There are 3 difficulty levels, each awarding a different amount of Gold Tokens depending on how much of the buns were eaten. At the easiest difficulty, 26 Gold Tokens are awarded if the bun is completely intact, while advanced rewards 88 Gold Tokens


Fugen Itto-Ryu Dojo[edit]

To initiate the cutscenes, Aldo should be in the party. However, you do not need him in the battle.

Go to the Fugen Itto-Ryu Dojo in Inanari Plateau after chapter 54 and speak to the Head of the Family. He will ask you to return everyday at dawn. Simply leave and re-enter the dojo, speak to him again, and repeat once more. He will invite you to be an official disciple after a rite of passage, which is a battle.

First Battle: Defeat Shion & Shigure to obtain Master Chiaki, a personal weapon for Aldo. This also unlocks food Fugen Itto-Ryu Breakfast from Shigure's grandfather. You do not need Aldo in the fight.

Second Battle Defeat Shion, Shigure and Akane to obtain Sound Body (Kata.) grasta. Your party must not have Shion, Shigure and Akane to start this battle. You do not need Aldo in the fight.

Enemies

Name
HP tooltip
SPD Level
Type
Affinities Locations
Drops
350207201.png Bunbuku 129
66
Mob
Weak:
Fire
Resist:
Slash
Inanari Plateau
350207301.png Red Raging Boar 130
66
Mob
Weak:
Fire
Resist:
Earth
Inanari Plateau
350207401.png Gold Spirit 176
66
Mob
Weak:
Water
Resist:
Fire
Inanari Plateau
350207301.png Raging Boar King 152
76
Horror
Weak:
Fire
Resist:
Earth
Inanari Plateau
104020031 sprite.png Shion 161
??
Hidden Boss
Weak:
Resist:
Inanari Plateau - Fugen Itto-Ryu Dojo
104020101 sprite.png Shigure 161
??
Hidden Boss
Weak:
Resist:
Inanari Plateau - Fugen Itto-Ryu Dojo
104020052 sprite.png Akane AS 161
??
Hidden Boss
Weak:
Resist:
Inanari Plateau - Fugen Itto-Ryu Dojo
104020032 sprite.png Shion AS 161
??
Hidden Boss
Weak:
Resist:
Inanari Plateau - Fugen Itto-Ryu Dojo
104020102 sprite.png Shigure AS 161
??
Hidden Boss
Weak:
Resist:
Inanari Plateau - Fugen Itto-Ryu Dojo
350207202.png Fairy Raccoon Dog 160
??
Hidden Boss
Weak:
Fire
Resist:
Water
Earth
Null:
Wing
Inanari Plateau
350901611.png Ogre Rancorem 160
??
Boss Form
Weak:
Resist:
Inanari Plateau
104020031 sprite.png Shion 122
??
Apprentice Test
Weak:
Resist:
Inanari Plateau - Fugen Itto-Ryu Dojo
104020101 sprite.png Shigure 122
??
Apprentice Test
Weak:
Resist:
Inanari Plateau - Fugen Itto-Ryu Dojo

Name
HP tooltip
SPD Level
Type
Affinities Locations
Drops
350207701.png Go-Wan 67
67
Mob
Weak:
Blunt
Fire
Resist:
Slash
Temple Ruins
350207702.png Kyo-Wan 67
67
Mob
Weak:
Blunt
Fire
Resist:
Pierce
Temple Ruins
350206602.png Shimmering Lantern 131
67
Mob
Weak:
Water
Resist:
Fire
Temple Ruins
350206501.png Scarlet Wheel 157
67
Mob
Weak:
Water
Resist:
Fire
Temple Ruins
350206602.png Ghost Lamp 154
77
Horror
Weak:
Water
Resist:
Null:
Fire
Temple Ruins
350206503.png One Wheel 160
??
Hidden Boss
Weak:
Resist:
Fire
Water
Null:
Earth
Temple Ruins
350206503.png Golden Wheel 157
??
Boss minion
Weak:
Wing
Resist:
Fire
Water
Null:
Earth
Temple Ruins
350904811.png Slash Demon 108
??
Boss
Weak:
Water
Resist:
Fire
Earth
Temple Ruins
• None
350208201.png Cleave Demon 189
??
Boss
Weak:
Fire
Resist:
Water
Slash
Temple Ruins
• None

Name
HP tooltip
SPD Level
Type
Affinities Locations
Drops
350206901.png Azure Crystal 136
69
Mob
Weak:
Earth
Blunt
Resist:
Fire
Pierce
Absorb:
Water
Kunlun Mountains
350206701.png Mountain Mystery 136
69
Mob
Weak:
Slash
Earth
Resist:
Fire
Water
Kunlun Mountains
350206801.png Silver Wolf 185
69
Mob
Weak:
Earth
Pierce
Resist:
Fire
Water
Kunlun Mountains
350206601.png Mysterious Lantern 154
79
Mob
Weak:
Water
Shade
Resist:
Fire
Kunlun Mountains (Hidden Path)
350206901.png Azure Crystal 155
79
Mob
Weak:
Earth
Blunt
Resist:
Fire
Pierce
Absorb:
Water
Kunlun Mountains (Hidden Path)
350206701.png Mountain Mystery 155
79
Mob
Weak:
Slash
Earth
Resist:
Fire
Water
Kunlun Mountains (Hidden Path)
350206801.png Silver Wolf 248
79
Mob
Weak:
Earth
Thunder
Pierce
Resist:
Fire
Water
Kunlun Mountains (Hidden Path)
350207801.png One Horn 187
79
Mob
Weak:
Fire
Thunder
Slash
Resist:
Wing
Kunlun Mountains (Hidden Path)
350211601.png Tobikura 216
79
Mob
Weak:
Fire
Water
Thunder
Crystal
Resist:
Wing
Kunlun Mountains (Hidden Path)
350206701.png Mountain Peak Ape 158
79
Horror
Weak:
Earth
Slash
Resist:
Fire
Water
Kunlun Mountains
Ice Jailer 100
??
Hidden Boss
Weak:
Wing
Resist:
Pierce
Fire
Water
Earth
Kunlun Mountains (Hidden Path)
• None
350206903.png Land Avatar 160
??
Hidden Boss
Weak:
Earth
Resist:
Fire
Wing
Null:
Water
Absorb:
Magic
Kunlun Mountains
350905111.png Sorcery Soldier 70
??
Boss
Weak:
Earth
Resist:
Pierce
Kunlun Mountains

Name
HP tooltip
SPD Level
Type
Affinities Locations
Drops
350206601.png Mysterious Lantern 137
70
Mob
Weak:
Water
Resist:
Fire
Specter Palace
350206502.png Indigo Wheel 164
70
Mob
Weak:
Earth
Resist:
Water
Specter Palace
350206401.png Yaksha Spider 140
70
Mob
Weak:
Fire
Slash
Blunt
Resist:
Pierce
Specter Palace
350208901.png Small Mouse 500
70
Mob
Weak:
Magic
Resist:
Specter Palace
• None
350209001.png Small Gecko 500
70
Mob
Weak:
Magic
Resist:
Specter Palace
• None
350206301.png Onigawara 139-141
70-71
Mob
Weak:
Earth
Blunt
Resist:
Specter Palace,Wicked Meadow
350206301.png Tsurube-otoshi 160
80
Horror
Weak:
Earth
Blunt
Resist:
Specter Palace
350206402.png Demon Spider 200
??
Hidden Boss
Weak:
Wing
Resist:
Fire
Water
Null:
Earth
Specter Palace
Void Shell 141
??
Boss part
Weak:
Earth
Blunt
Resist:
Water
Specter Palace
350905011.png Ghastly Mizuchi 141
??
Boss
Weak:
Earth
Slash
Resist:
Water
Blunt
Magic
Null:
Fire
Specter Palace

Name
HP tooltip
SPD Level
Type
Affinities Locations
Drops
350206301.png Onigawara 139-141
70-71
Mob
Weak:
Earth
Blunt
Resist:
Specter Palace,Wicked Meadow
350207801.png One Horn 169
71
Mob
Weak:
Fire
Slash
Resist:
Wing
Wicked Meadow
350207901.png Jellypod 139
71
Mob
Weak:
Wing
Earth
Resist:
Slash
Pierce
Blunt
Fire
Null:
Water
Wicked Meadow
350208002.png Alluring Fire 190
71
Mob
Weak:
Water
Resist:
Null:
Fire
Wicked Meadow
350207801.png Wind Banner Horn 161
81
Horror
Weak:
Fire
Slash
Resist:
Wing
Wicked Meadow
350207902.png Moonfire 160
??
Hidden Boss
Weak:
Water
Resist:
Earth
Wing
Null:
Fire
Slash
Blunt
Pierce
Wicked Meadow

Name
HP tooltip
SPD Level
Type
Affinities Locations
Drops
350207802.png Twin Horns 169
71
Mob
Weak:
Fire
Slash
Resist:
Wing
Earth
Water
Mahora Lake
350206902.png Crimson Crystal 140
71
Mob
Weak:
Water
Blunt
Resist:
Pierce
Absorb:
Fire
Mahora Lake
350208001.png Ominous Fire 190
71
Mob
Weak:
Water
Resist:
Null:
Fire
Mahora Lake
350206902.png Deep Red Crystal 161
81
Horror
Weak:
Water
Blunt
Resist:
Pierce
Absorb:
Fire
Mahora Lake
350207803.png Strong Fox Spirit 160
80
Hidden Boss
Weak:
Fire
Resist:
Water
Earth
Null:
Wing
Mahora Lake
Shokera
??
Boss
Weak:
Resist:
Mahora Lake
• None

Name
HP tooltip
SPD Level
Type
Affinities Locations
Drops
350208201.png Cleave Shadow 194-197
72-73
Mob
Weak:
Slash
Fire
Resist:
Pierce
Water
Jiraiya Fortress
350207001.png Spin Shadow 143-145
72-73
Mob
Weak:
Earth
Pierce
Resist:
Wing
Jiraiya Fortress
350206201.png Wild Shadow 143-145
72-73
Mob
Weak:
Pierce
Wing
Resist:
Earth
Jiraiya Fortress
350208301.png Slash Shadow 142-144
72-73
Mob
Weak:
Water
Blunt
Resist:
Fire
Pierce
Jiraiya Fortress
350206201.png Sentry of Vajra 163
82
Horror
Weak:
Wing
Pierce
Resist:
Earth
Jiraiya Fortress
350905511.png Suzaku 191
??
Boss
Weak:
Water
Resist:
Jiraiya Fortress
• None
350905211.png Suzaku 191
??
Boss
Weak:
Water
Resist:
Jiraiya Fortress
350206101.png Karakuri 145
??
Boss
Weak:
Resist:
Jiraiya Fortress

Weapons & Armor

After the completion of Chapter 51, a new series of mini-games are unlocked. Gold Tokens are collected from these games and can be used to exchange for the Gold Weapons.

Name Stats Obtain / Effects
211000251 ui.png
202000000 icon.png
160 - MAt
19 - Atk
60 - LVL
Nagsham Gold Token Trade
  • Rags to Riches (⁜)
    • Git+ (25%)
211010281 ui.png
202000001 icon.png
160 - Atk
19 - MAt
60 - LVL
Nagsham Gold Token Trade
  • Rags to Riches (⁜)
    • Git+ (25%)
211020251 ui.png
202000002 icon.png
166 - Atk
28 - MAt
60 - LVL
Nagsham Gold Token Trade
  • Rags to Riches (⁜)
    • Git+ (25%)
211030271 ui.png
202000003 icon.png
173 - Atk
7 - MAt
60 - LVL
Nagsham Gold Token Trade
  • Rags to Riches (⁜)
    • Git+ (25%)
211040281 ui.png
202000004 icon.png
160 - Atk
19 - MAt
60 - LVL
Nagsham Gold Token Trade
  • Rags to Riches (⁜)
    • Git+ (25%)
211050251 ui.png
202000005 icon.png
144 - Atk
41 - MAt
60 - LVL
Nagsham Gold Token Trade
  • Rags to Riches (⁜)
    • Git+ (25%)
211060251 ui.png
202000006 icon.png
157 - Atk
26 - MAt
60 - LVL
Nagsham Gold Token Trade
  • Rags to Riches (⁜)
    • Git+ (25%)
211070281 ui.png
202000007 icon.png
144 - Atk
105 - MAt
60 - LVL
Nagsham Gold Token Trade
  • Rags to Riches (⁜)
    • Git+ (25%)


These weapons can be obtained as rewards for killing hidden Dark Spirit Superbosses. These have passive effects and cannot be upgraded, although later can be reforged. To start this series, talk to the Information Broker in the Tavern of Izana. He asks for 100,000 Git and 30 minutes to investigate one of the rumors. Once he's done, he re-appears in the Tavern with a Curse Breaking key item in hand, which unlocks the relevant boss fight. Keep doing that and then once all Spirits have been defeated, speak to him one more time to obtain the final achievement.

Rumors and their Corresponding Weapons[edit]


Name Stats Obtain / Effects
211000241 ui.png
202000000 icon.png
185 - MAt
22 - Atk
60 - LVL
Defeat Fairy Raccoon Dog
  • Somber Light (⁜)
    • Non-type Attack+ (25%)
    • Physical Resistance+ (10%)
211010271 ui.png
202000001 icon.png
185 - Atk
22 - MAt
60 - LVL
Defeat Land Avatar
  • Endure Hardship (⁜)
    • Damage+ When HP <50% (30%)
    • MP+ (30)
211020241 ui.png
202000002 icon.png
192 - Atk
32 - MAt
60 - LVL
Defeat One Wheel
  • Surrounding Beauty (⁜)
    • When attack(20%, 3 turns): Power- (10%)
    • END+ (20)
211030261 ui.png
202000003 icon.png
200 - Atk
8 - MAt
60 - LVL
Defeat Moonfire
  • Refreshing Breeze (⁜)
    • Type Attack+ (10%)
    • Status power(poison & pain from skills only)+ (20%)
211040271 ui.png
202000004 icon.png
185 - Atk
22 - MAt
60 - LVL
Defeat Demon Spider
  • Autumn Grace (⁜)
    • SPD+ (20)
    • When Reserve MP Restore+ (55%)
211050241 ui.png
202000005 icon.png
167 - Atk
47 - MAt
60 - LVL
Defeat Protection Demon
  • Deep Valleys (⁜)
    • When attack(10%, 3 turns): Piercing Resistance- (10%)
    • Type Resistance+ (10%)
211060241 ui.png
202000006 icon.png
181 - Atk
30 - MAt
60 - LVL
Defeat Strong Fox Spirit
  • Seasons Beauty (⁜)
    • Type Attack+ (10%)
    • SPD+ (20)
211070271 ui.png
202000007 icon.png
167 - Atk
121 - MAt
60 - LVL
Defeat Tomoe Snake
  • Stand Tall (⁜)
    • HP+ (1000)
    • When attack: Stun (15%)

Rank Name Requirement Reward
Gold Rank Badge.png Overcoming the One Wheel Beat the One Wheel. Gem.pngx50
Gold Rank Badge.png Overcoming the Demon Spider Beat the Demon Spider. Gem.pngx50
Gold Rank Badge.png Overcoming the Land Avatar Beat the Land Avatar. Gem.pngx50
Gold Rank Badge.png Overcoming the Strong Fox Spirit Beat the Strong Fox Spirit. Gem.pngx50
Gold Rank Badge.png Overcoming the Moonfire Beat the Moonfire. Gem.pngx50
Gold Rank Badge.png Overcoming the Tomoe Snake Beat the Tomoe Snake. Gem.pngx50
Gold Rank Badge.png Overcoming the Protection Demon Beat the Protection Demon. Gem.pngx50
Gold Rank Badge.png Overcoming the Fairy Raccoon Dog Beat the Fairy Raccoon Dog. Gem.pngx50
Gold Rank Badge.png Garulea Continent Mystery Investigation Team Defeat all eight of the spirits rumored about on the Garulea Continent. Gem.pngx50

These are the reforged versions, for which you will need access to the NPC Wandering Blacksmith in Fileria, part of Into the Hollow. The Chronos Empire Strikes Back. Volume 1 (chapter 89).

Name Stats Obtain / EffectsMaterials
211000241 ui.png
202000000 icon.png
218 - MAt
26 - Atk
60 - LVL
Enhance at the Wandering Blacksmith in Fileria
  • Somber Light II (⁜)
    • Non-type Attack+ (50%)
    • Physical Resistance+ (15%)
    • Type Resistance+ (15%)
211010271 ui.png
202000001 icon.png
218 - Atk
26 - MAt
60 - LVL
Enhance at the Wandering Blacksmith in Fileria
  • Endure Hardship II (⁜)
    • Damage+ When HP <50% (50%)
    • MP+ (30)
    • Critical Rate+ (100%)
211020241 ui.png
202000002 icon.png
227 - Atk
37 - MAt
60 - LVL
Enhance at the Wandering Blacksmith in Fileria
  • Surrounding Beauty II (⁜)
    • When attack(100%, 3 turns): Power- (20%)
    • END+ (30)
    • Physical resistance+ (15%)
211030261 ui.png
202000003 icon.png
235 - Atk
11 - MAt
60 - LVL
Enhance at the Wandering Blacksmith in Fileria
  • Refreshing Breeze (⁜)
    • Type Attack+ (10%)
    • Status power(poison & pain from skills only)+ (20%)
    • When enemy with Pain: DMG+ (Multiplier) (15% (x1.15))
    • When enemy with Poison: DMG+ (Multiplier) (15% (x1.15))
211040271 ui.png
202000004 icon.png
218 - Atk
26 - MAt
60 - LVL
Enhance at the Wandering Blacksmith in Fileria
  • Autumn Grace II (⁜)
    • SPD+ (25)
    • When Reserve MP Restore+ (55%)
    • Immunity to Stun, Sleep, Freeze (+)
211050241 ui.png
202000005 icon.png
196 - Atk
55 - MAt
60 - LVL
Enhance at the Wandering Blacksmith in Fileria
  • Deep Valleys II (⁜)
    • When attack(100%, 3 turns): Piercing Resistance- (30%)
    • Type Resistance+ (10%)
    • SPD+ (20)
211060241 ui.png
202000006 icon.png
213 - Atk
35 - MAt
60 - LVL
Enhance at the Wandering Blacksmith in Fileria
  • Seasons Beauty II (⁜)
    • Type Attack+ (15%)
    • SPD+ (20)
    • Physical resistance+ (10%)
211070271 ui.png
202000007 icon.png
196 - Atk
143 - MAt
60 - LVL
Enhance at the Wandering Blacksmith in Fileria
  • Stand Tall II (⁜)
    • HP+ (2000)
    • When attack: Stun (15%)
    • Normal Attack to All Targets (+)

Name Stats Obtain / EffectsMaterials
211000261 ui.png
202000000 icon.png
175 - MAt
21 - Atk
60 - LVL
Purchased from Blacksmith
  • Snake Formation (+10)
    • All Status Resistance+ (10%)
    • SPD+ (10)
211010301 ui.png
202000001 icon.png
175 - Atk
21 - MAt
60 - LVL
Purchased from Blacksmith
  • Flock Formation (+10)
    • Type Attack+ (10%)
    • SPD+ (10)
211020281 ui.png
202000002 icon.png
182 - Atk
30 - MAt
60 - LVL
Purchased from Blacksmith
  • Crescent Formation (+10)
    • Non-type Attack+ (20%)
    • When attack(10%, 3 turns): Slash Resistance- (10%)
211030281 ui.png
202000003 icon.png
189 - Atk
8 - MAt
60 - LVL
Purchased from Blacksmith
  • Fish Scale Formation (+10)
    • Physical Resistance+ (10%)
    • When attack(15%, 3 turns): Power- (10%)
211040301 ui.png
202000004 icon.png
175 - Atk
21 - MAt
60 - LVL
Purchased from Blacksmith
  • Crane Formation (+10)
    • Non-type Attack+ (25%)
    • When attack(20%, 3 turns): SPD- (10%)
211050261 ui.png
202000005 icon.png
158 - Atk
44 - MAt
60 - LVL
Purchased from Blacksmith
  • Arrow Formation (+10)
    • Type Attack+ (10%)
    • When attack(10%, 3 turns): Inflict Pain (40% MOD)
211060261 ui.png
202000006 icon.png
172 - Atk
29 - MAt
60 - LVL
Purchased from Blacksmith
  • Column Formation (+10)
    • Non-type Attack+ (25%)
    • When attack: Stun (15%)
211070291 ui.png
202000007 icon.png
158 - Atk
115 - MAt
60 - LVL
Purchased from Blacksmith
  • Circle Formation (+10)
    • Type Attack+ (10%)
    • Reserves MP Restore+ (55%)

These are the reforged versions, for which you will need access to the NPC Wandering Blacksmith in Fileria, part of Into the Hollow. The Chronos Empire Strikes Back. Volume 1 (chapter 89). However the materials to upgrade these weapons are from Into the Hollow. The Chronos Empire Strikes Back. Volume 2. You are required to have maxed out the equipment (to Lv10) at the Nopaew Emporium for reforge to become available.

Name Stats Obtain / EffectsMaterials
211000261 ui.png
202000000 icon.png
201 - MAt
23 - Atk
60 - LVL
Enhance at the Wandering Blacksmith in Fileria
  • Snake Formation II (⁜)
    • All Status Resistance+ (10%)
    • SPD+ (20)
    • Damage taken decrease over turns (3%-15%)
211010301 ui.png
202000001 icon.png
202 - Atk
23 - MAt
60 - LVL
Enhance at the Wandering Blacksmith in Fileria
  • Flock Formation II (⁜)
    • Type Attack+ (10%)
    • SPD+ (30)
    • HP+ (1000)
211020281 ui.png
202000002 icon.png
210 - Atk
34 - MAt
60 - LVL
Enhance at the Wandering Blacksmith in Fileria
  • Crescent Formation II (⁜)
    • Non-type Attack+ (20%)
    • When attack(10%, 3 turns): Slash Resistance- (10%)
    • Type Attack+ ((10 + ([Light/Shadow] X 0.04)% Max:20%))
211030281 ui.png
202000003 icon.png
218 - Atk
10 - MAt
60 - LVL
Enhance at the Wandering Blacksmith in Fileria
  • Fish Scale Formation II (⁜)
    • Physical Resistance+ (10%)
    • When attack(15%, 3 turns): Power- (10%)
    • PWR+ ((20 + ([Light/Shadow] / 12.5)) Max: 40)
    • Weak Point Damage+ (50%)
211040301 ui.png
202000004 icon.png
201 - Atk
23 - MAt
60 - LVL
Enhance at the Wandering Blacksmith in Fileria
  • Crane Formation II (⁜)
    • Non-type Attack+ (50%)
    • When attack(20%, 3 turns): SPD- (20%)
    • in Another Zone: Damage+ (Multiplier) (15%)
    • Another Force Combo Rate+ (1%)
211050261 ui.png
202000005 icon.png
181 - Atk
51 - MAt
60 - LVL
Enhance at the Wandering Blacksmith in Fileria
  • Arrow Formation II (⁜)
    • Type Attack+ (10%)
    • When attack(100%, 3 turns): Pain (40% MOD)
    • When enemy with Pain: DMG+ (20%)
211060261 ui.png
202000006 icon.png
196 - Atk
32 - MAt
60 - LVL
Enhance at the Wandering Blacksmith in Fileria
  • Column Formation II (⁜)
    • Non-type Attack+ (20%-25%)
    • When attack: Stun (15%)
    • Damage taken decrease over turns (3-15%)
    • HP+ (2000)
211070291 ui.png
202000007 icon.png
181 - Atk
133 - MAt
60 - LVL
Enhance at the Wandering Blacksmith in Fileria
  • Circle Formation II (⁜)
    • Type Attack+ (10%)
    • Reserves MP Restore+ (40%-55%)
    • PWR+ (20)

Name Stats Obtain / EffectsMaterials
216000002 icon.png
175 - Def
157 - MDef
60 - LVL
Purchase from Blacksmith.
  • Tempered Power (+10)
    • HP+ (300)
216000003 icon.png
157 - Def
157 - MDef
60 - LVL
Purchase from Blacksmith.
  • Tempered Power (+10)
    • HP+ (300)
216000004 icon.png
142 - Def
175 - MDef
60 - LVL
Purchase from Blacksmith.
  • Tempered Power (+10)
    • HP+ (300)
216000002 icon.png
175 - Def
157 - MDef
60 - LVL
Purchase from Blacksmith.
  • Discipline Power (+10)
    • MP+ (50)
216000003 icon.png
157 - Def
157 - MDef
60 - LVL
Purchase from Blacksmith.
  • Discipline Power (+10)
    • MP+ (50)
216000004 icon.png
142 - Def
175 - MDef
60 - LVL
Purchase from Blacksmith.
  • Discipline Power (+10)
    • MP+ (50)
216000002 icon.png
185 - Def
166 - MDef
60 - LVL
Present Garulea Continent (Hard)
  • Thousand Years (⁜)
    • Type Resistance+ (10%)
216000003 icon.png
166 - Def
166 - MDef
60 - LVL
Present Garulea Continent (Hard)
  • Thousand Years (⁜)
    • Type Resistance+ (10%)
216000004 icon.png
150 - Def
185 - MDef
60 - LVL
Present Garulea Continent (Hard)
  • Thousand Years (⁜)
    • Type Resistance+ (10%)

Awards

Rank Name Requirement Reward
Copper Rank Badge.png Morning of a New Journey Clear Chapter 45 "Friends: To the Other End of Time." Gem.pngx100
Copper Rank Badge.png The Goddess of Time Calls... Clear Chapter 46 "New Chapter: Voice of the Goddess of Time Calls." Gem.pngx100
Copper Rank Badge.png Landfall in Izana Clear Chapter 47 "To the East! Something Awaits Across the Sea." Gem.pngx100
Copper Rank Badge.png Reunion with the Baron Clear Chapter 48 "Cat Shrine: Awakening a New Power!" Gem.pngx100
Copper Rank Badge.png Brush with a Demon Clan Clear Chapter 49 "Mystery of the Temple Ruins: The Bandits' True Form?" Gem.pngx100
Copper Rank Badge.png Apparition: Face Off with the Mask Monster Clear Chapter 50 "Kurosaki Castle: Welcome to the Ghost Banquet." Gem.pngx100
Copper Rank Badge.png Empress Garneli: A Smile Clear Chapter 51 "Land of Shin: The Suspicious Empress Snickers." Gem.pngx100
Copper Rank Badge.png Crushing the Ghastly Mizuchi! Clear Chapter 52 "The Specter Palace: Scared Stiff." Gem.pngx100
Copper Rank Badge.png The One Soaking in the Hot Springs Clear Chapter 53 "Wicked Meadow: Song of the Destructive Wind." Gem.pngx100
Copper Rank Badge.png The Daughter of Time Clear Chapter 54 "Secret of the Lake: Illusion of the Chapel." Gem.pngx100
Copper Rank Badge.png Jiraiya Fortress Silenced Clear Chapter 55 "A Raid! Jiraiya Fortress is on the Move." Gem.pngx100
Copper Rank Badge.png Empress Garneli's Birthday Festival Clear "Bell Strike" at Empress Garneli's Birthday Festival. Gem.pngx5
Copper Rank Badge.png Empress Garneli's Birthday Festival Clear "Hammer Break - Single Rock" at Empress Garneli's Birthday Festival. Gem.pngx5
Copper Rank Badge.png Empress Garneli's Birthday Festival Clear "Hammer Break - Multi-Rock" at Empress Garneli's Birthday Festival. Gem.pngx5
Copper Rank Badge.png Empress Garneli's Birthday Festival Clear "Cat Race" at Empress Garneli's Birthday Festival. Gem.pngx5
Copper Rank Badge.png Empress Garneli's Birthday Festival Clear "Dummy Smash" at Empress Garneli's Birthday Festival. Gem.pngx5
Copper Rank Badge.png Empress Garneli's Birthday Festival Clear "Test of Power" at Empress Garneli's Birthday Festival. Gem.pngx5
Copper Rank Badge.png Empress Garneli's Birthday Festival Clear "Gather Ingredients - Easy" at Empress Garneli's Birthday Festival. Gem.pngx5
Copper Rank Badge.png Empress Garneli's Birthday Festival Clear "Gather Ingredients - Medium" at Empress Garneli's Birthday Festival. Gem.pngx5
Copper Rank Badge.png Empress Garneli's Birthday Festival Clear "Gather Ingredients - Hard" at Empress Garneli's Birthday Festival. Gem.pngx5
Copper Rank Badge.png Empress Garneli's Birthday Festival Clear "Find the Differences - 3" at Empress Garneli's Birthday Festival. Gem.pngx5
Copper Rank Badge.png Empress Garneli's Birthday Festival Clear "Find the Differences - 5" at Empress Garneli's Birthday Festival. Gem.pngx5
Copper Rank Badge.png Eastern Culture Evangelist Hand over all of the souvenirs from the Eastern continent to Macminal. Gem.pngx5